How to create a Debit note in JioGST Bill Lite

Creating a Debit Note against an Invoice in JioGST Bill Lite

To create Debit Note follow the below mentioned steps:
1. Select the Invoice from the 'Document History' in 'Documents Management' tab.
Scroll down to the bottom of the Invoice you will see the below options on tapping the 'Option' Button.


2. Tap on 'View/Create Credit/Debit Note' option.
You will be taken to the below 'Credit/Debit note' screen.
Here you will see details of already created Credit/Debit note against this invoice. If you have not created any Credit/Debit note no data will be available. To create a new Credit/Debit note tap on 'Create Credit/Debit note' button.


3. This is the 'Generate Credit Note/Debit note' page.
On this page fill the below mentioned details:


  • Choose Note type:
    Select either option of Credit or Debit note creation. To create a Debit Note tap on 'Debit Note' option
  • Choose regime type:
    Select whether the invoice was created during Pre-GST or Post-GST period
  • Select a reason:
    Select a reason for the creation of Credit/Debit note from the available options in the drop-down.

  • Goods/Services details:
    Select the Goods/Services against which debit note is to be created. You can select all or selective Goods/Services. Once you check the check box against a Good/Service, the 'Debit Note Details' column will be enabled.
    Enter details like the Quantity, Taxable value, Tax rate % and Cess to create Debit Note. Once these details are filled the 'Value after tax' will be auto-calculated.


You will also see the sum of the values of all Debit Notes previously created if any against this Invoice in 'DN value previously created'

Once all the details are filled, tap on 'Preview Debit Note' button.
You will be taken to the preview page where a draft of Debit Note will be seen. If all the details are correct tap on 'Send Debit Note' button else tap on 'Edit' button to make changes.


Once you tap on 'Send Debit Note' button, Debit Note will be created and an email with pdf of the debit note will be sent to you along with the customer.

Debit Note is generated successfully. Tap on 'OK' button.

You can view this Debit Note by selecting the Invoice from Document History and tap on 'View/Create Credit/Debit Note' option

The debit note will be displayed in the below format. You can also create multiple Debit notes against this invoice by tapping on 'Create Credit/Debit Note' button.

How to Download JioGST Bill Lite?

Bill Lite is a software product built by JioGST

How to create Credit Notes in JioGST Bill Lite

Creating a Credit Note against an Invoice in JioGST Bill Lite

To create Credit Note follow the below mentioned steps:
1. Select the Invoice from the 'Document History' in 'Documents Management' tab.
Scroll down to the bottom of the Invoice you will see the below options on tapping the 'Option' Button.


2. Tap on 'View/Create Credit/Debit Note' option.
You will be taken to the below 'Credit/Debit note' screen.
Here you will see details of already created Credit/Debit note against this invoice. If you have not created any Credit/Debit note no data will be available. To create a new Credit/Debit note tap on 'Create Credit/Debit note' button.


3. This is the 'Generate Credit Note/Debit note' page.
On this page fill the below mentioned details:

  • Choose Note type:
    Select either option of Credit or Debit note creation. To create a Credit Note tap on 'Credit Note' option
  • Choose regime type:
    Select whether the invoice was created during Pre-GST or Post-GST period
  • Select a reason:
    Select a reason for the creation of Credit/Debit note from the available options in the drop-down
  • Goods/Services details:
    Select the Goods/Services against which credit note is to be created. You can select all or selective Goods/Services. Once you check the check box against a Good/Service, the 'Credit Note Details' column will be enabled.
    Enter details like the Quantity, Taxable value, Tax rate % and Cess to create Credit Note. Once these details are filled the 'Value after tax' will be auto-calculated.

Please Note: The Value after tax for the Credit Note should not be greater than the Value after tax for the Original product. 
You will also see the sum of the values of all Credit Notes previously created if any against this Invoice in 'CN value previously created'

Once all the details are filled, tap on 'Preview Credit Note' button.
You will be taken to the preview page where a draft of Credit Note will be seen. If all the details are correct tap on 'Send Credit Note' button else tap on 'Edit' button to make changes.

Once you tap on 'Send Credit Note' button, Credit Note will be created and an email with pdf of the credit note will be sent to you along with the customer.


Credit Note is generated successfully. Tap on 'OK' button.

You can view this credit Note by selecting the Invoice from Document History and tap on 'View/Create Credit/Debit Note' option

The credit Note will be displayed in the below format. You can also create multiple Credit notes against this invoice by tapping on 'Create Credit/Debit Note' button.


How to Download JioGST Bill Lite?

Bill Lite is a software product built by JioGST

How to create Invoice cum Bill of Supply in JioGST Bill Lite

Creating Invoice cum Bill of Supply in JioGST Bill Lite

To create Invoice cum Bill of Supply tap on 'Documents' tab in the Home page and select 'Generate Document' option


You will be taken to the Generate Document screen. On this page fill the below mentioned details:
1. Document type: 
Select the type of document you want to create from the drop-down. Using JioGST Bill Lite you can create Invoices, Bill of Supply & Invoice cum Bill of Supply.
For creating Invoice cum Bill of Supply select 'Invoice cum Bill of Supply' option.

2. Select GSTIN:
Select GSTIN from the drop down against which you want to create the Invoice. Dropdown will have the list of all the added GSTIN's from your account.

3. Document date:
Select the date against which you want to create the Invoice cum Bill of Supply from the calendar.

4. Document for:
In JioGST Bill Lite, Invoice cum Bill of Supply can be created for Goods/Services. Select one of the option.

 5. Goods/Services sold through Ecommerce operator:
If the goods/services are sold through e-commerce operator select this option. You will also have to enter the GSTIN of the E-commerce operator.

6. Reverse Charge applicable:
If the document attracts reverse charge select this option.

7. Document Period:
If the Invoice cum Bill of Supply is created for Services than you need to fill the time period for which the service was delivered. If it is for Goods, you wont see this option.

8. Customer Name/ Mobile No.
Enter the first few alphabets/digits of the Name/Mobile No. of the customer against which you want to create this Invoice cum Bill of Supply.
Please ensure you have added Customer in the customer master. If no customer is added in the customer master you will first have to add a customer and then create Invoice cum Bill of Supply.

To add a customer in the Customer Master read blog:

9. Make Shipping Address same as Billing address
By default this option will be checked, in case your Shipping address is not same as Billing Address uncheck the check box.
A list of the below mentioned fields will appear on screen:

  • Ship to Customer Name: Enter the name of the customer to whom the Goods/Services will be shipped
  • Ship to Address: Enter the address where the Goods/Services needs to be shipped
  • Ship to Pin code: Enter the Pin-code for the above mentioned address
  • Ship to City, Place of Supply: Both these fields will be auto-populated based on the entered pin-code in the above field
10. Bill Method:
Select the Billing method from the drop-down. Billing method can be either 'Quantity based' or 'Lump sum' 
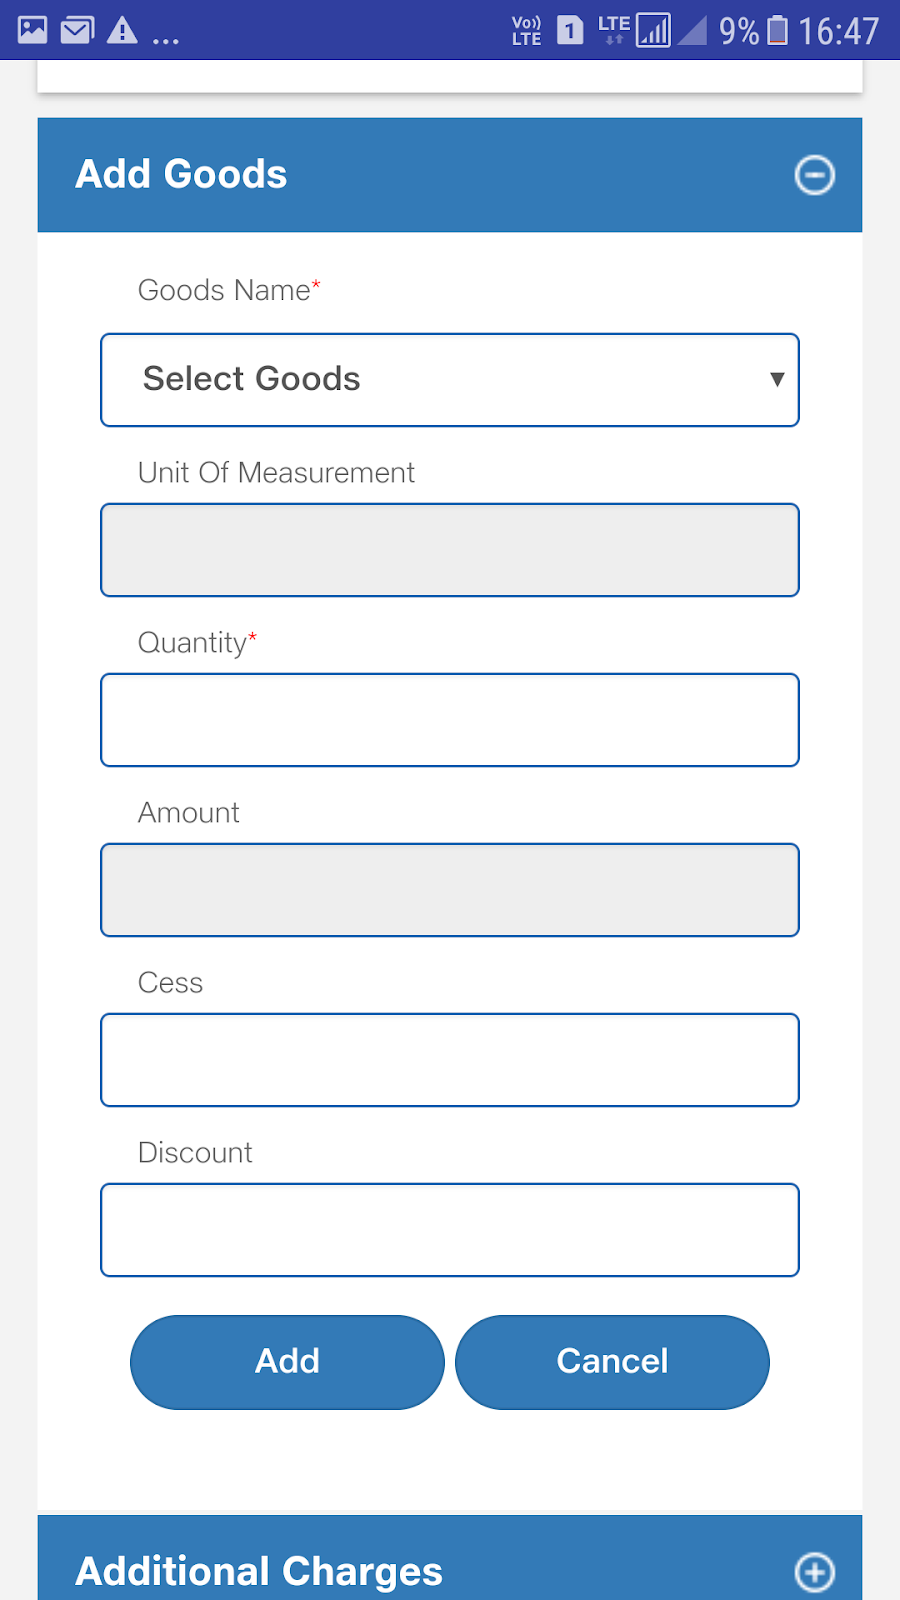
11. Add Goods:
Tap on the add icon/Add Goods. The below mentioned fields will appear on screen.
To create Invoice cum Bill of Supply for Goods/Services, atleast one Good/Service must be added in the Goods/Service master catalogue. 

 To add Goods in the Goods Catalogue master read blog:
https://jiogstbilllite.blogspot.com/2018/03/goods-Master-jioGST-Bill-Lite-HSN-SAC-code-UOM-tax-rate.html

To add Services in the Services catalogue master read blog:
https://jiogstbilllite.blogspot.com/2018/03/Services-Master-jioGST-Bill-Lite-HSN-SAC-code-UOM-tax-rate.html

  • Goods Name: Select the Goods form the drop-down. You will get the list of all the added Goods from the Goods master here.
  • Unit of Measurement: This will be auto-populated form the Goods Master based on the Goods you select.
  • Quantity: Enter the quantity you want to sell for the selected goods.
  • Amount: This field will be auto-calculated based on the values you provide in the above 'Quantity' field and the 'Goods rate' mentioned in the Goods master for this good/product
  • Cess: Enter the cess against this product
  • Discount: Discount provided if any against this product can be entered in this field.
    After filling the above details tap on 'Add' button. The added good will be seen on screen, you can also Edit or Delete this Good by clicking on respective icons besides it.
    For adding Multiple Goods within this Invoice cum Bill of Supply tap on 'Add' button.
12. Additional Charges: 
Additional charges if any can be included against this Invoice cum Bill of Supply by tapping on Additional Charges or the add icon.
Select the additonal charge from the drop down. A list of all the added additional charges from the Additional Charges master will be displayed.

If no additional charge is added in the master than you will first have to add one in the Additional Charge Master.

To add additional Charges in the Additional Charge master read this post:

Amount will be auto-populated from the master. You can even edit the amount value.
Once the above details are filled, tap on Add button. You can also add multiple additional charges in a single Invoice cum Bill of Supply. All the added additional charges will appear on screen.

13. Footer Note:
Footer Note is field where you can mention other details like Bank Account Number, Mobile No for your customers.

Once all the above details are filled, you can tap on 'Preview Final Invoice cum Bill of Supply' button to preview it before creation.

You will be taken to the 'Preview' screen.
On this page the final Invoice cum Bill of Supply will be displayed. All the tax rates and calculation will be done automatically.


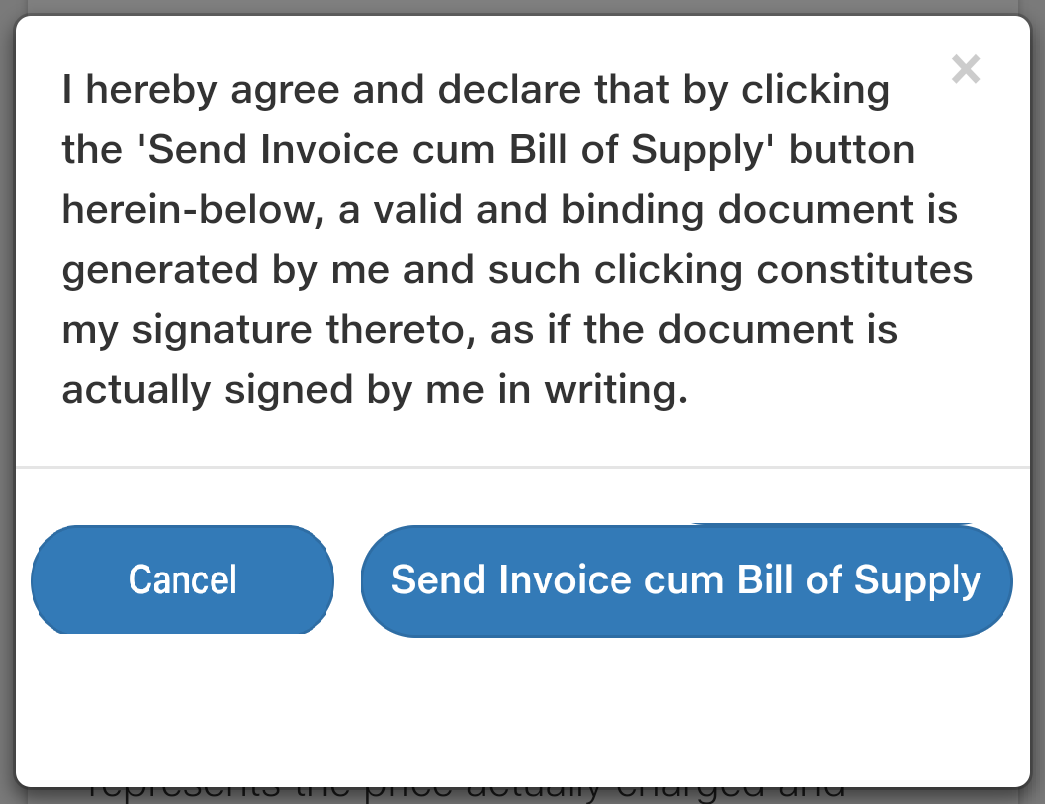
Once verified you can create the Invoice cum Bill of Supply by tapping on 'Send Invoice cum Bill of Supply' button at the bottom of the page. In case you want to make some changes tap on 'Edit' button

A pop-up of Terms & Conditions would appear on screen. On tapping 'Send Bill of Supply' it will be created and an email with the pdf of Invoice cum Bill of Supply will be sent to the customer as well as to your email id.


You will now see a pop-up displaying the Invoice cum Bill of Supply Id.
The Invoice cum Bill of Supply has been created successfully. Click on 'OK' button

You can check the Invoice cum Bill of Supply you just created in the 'Document History' option under 'Documents Management' tab. 
Document Number of all the Invoices/Bill of Supply/Invoice cum Bill of Supply generated will be displayed on this screen.


How to Download JioGST Bill Lite?

Bill Lite is a software product built by JioGST

How to create Bill of Supply in JioGST Bill Lite

Creating Bill of Supply in JioGST Bill Lite

To create Bill of Supply tap on 'Documents' tab in the Home page and select 'Generate Document' option

You will be taken to the Generate Document screen. On this page fill the below mentioned details:

1. Document type: 
Select the type of document you want to create from the drop-down. Using JioGST Bill Lite you can create Invoices, Bill of Supply & Invoice cum Bill of Supply.
For creating Bill of Supply select 'Bill of Supply' option.


2. Select GSTIN:
Select GSTIN from the drop down against which you want to create the Invoice. Dropdown will have the list of all the added GSTIN's from your account.

3. Document date:
Select the date against which you want to create the Bill of Supply from the calendar.

4. Document for:
In JioGST Bill Lite, Bill of Supply can be created for Goods/Services. Select one of the option.

 5. Goods/Servcies sold through Ecommerce operator:
If the goods/services are sold through e-commerce operator select this option. You will also have to enter the GSTIN of the E-commerce operator.

6. Reverse Charge applicable:
If the document attracts reverse charge select this option.

7. Document Period:
If the Bill of Supply is created for Services than you need to fill the time period for which the service was delivered. If it is for Goods, you wont see this option.

8. Customer Name/ Mobile No.
Enter the first few alphabets/digits of the Name/Mobile No. of the customer against which you want to create this Bill of Supply.
Please ensure you have added Customer in the customer master. If no customer is added in the customer master you will first have to add a customer and than create Bill of Supply.

To add a customer in the Customer Master read blog:

9. Make Shipping Address same as Billing address
By default this option will be checked, in case your Shipping address is not same as Billing Address uncheck the check box.
A list of the below mentioned fields will appear on screen:
  • Ship to Customer Name:Enter the name of the customer to whom the Goods/Services will be shipped
  • Ship to Address: Enter the address where the Goods/Services needs to be shipped
  • Ship to Pin code: Enter the Pin-code for the above mentioned address
  • Ship to City, Place of Supply: Both these fields will be auto-populated based on the entered pin-code in the above field
10. Bill Method:
Select the Billing method from the drop-down. Billing method can be either ''Quantity based'' or ''Lumpsum''

 11. Add Goods:
Tap on the add icon/Add Goods. The below mentioned fields will appear on screen.
To create Bill of Supply for Goods/Services, atleast one Good/Service  must be added in the Goods/ Service master catalogue.  

To add Goods in the Goods catalogue master read this post:
https://jiogstbilllite.blogspot.com/2018/03/goods-Master-jioGST-Bill-Lite-HSN-SAC-code-UOM-tax-rate.html 
To add Services in the Service catalogue master read blog:
https://jiogstbilllite.blogspot.com/2018/03/Services-Master-jioGST-Bill-Lite-HSN-SAC-code-UOM-tax-rate.html
  • Goods Name: Select the Goods form the drop-down. You will get the list of all the added Goods from the Goods master here.
  • Unit of Measurement: This will be auto-populated form the Goods Master based on the Goods you select.
  • Quantity: Enter the quantity you want to sell for the selected goods.
  • Amount: This field will be auto-calculated based on the values you provide in the above "Quantity" field and the "Goods rate" mentioned in the Goods master for this good/product
  • Cess: Enter the cess against this product
  • Discount: Discount provided if any against this product can be entered in this field.

    After filling the above details tap on "Add" button. The added good will be seen on screen, you can also Edit or Delete this Good by clicking on respective icons besides it.
    For adding Multiple Goods within this Bill of Supply tap on "Add" button.
12. Additional Charges: 
Additional charges if any can be included against this Bill of Supply by tapping on Additional Charges or the add icon.
Select the additional charge from the drop down. A list of all the added additional charges from the Additional Charges master will be displayed.

If no additional charge is added in the master than you will first have to add one in the Additional Charge Master.

To add additional Charges in the Additional Charge master read this post:


Amount will be auto-populated from the master. You can even edit the amount value.
Once the above details are filled, tap on Add button. You can also add multiple additional charges in a single Bill of Supply. All the added additional charges will appear on screen.

13. Footer Note:
Footer Note is field where you can mention other details like Bank Account Number, Mobile No for your customers.
Once all the above details are filled, you can tap on ''Preview Final Bill of Supply'' button to preview the Bill of Supply before creation.

You will be taken to the ''Preview Bill of Supply'' screen.
On this page the final Bill of Supply will be displayed. All the tax rates and calculation will be done automatically.


Once verified you can create the Bill of Supply by tapping on ''Send Bill of Supply'' button at the bottom of the page. In case you want to make some changes tap on ''Edit'' button.


A pop-up of declaration would appear on screen. On tapping "Send Bill of Supply'' it will be created and an email with the pdf  of Bill of Supply will be sent to the customer as well as to your email id.

You will now see a pop-up displaying the Bill of Supply Id.

The Bill of Supply has been created successfully. Click on OK button

You can check the Bill of Supply you just created in the ''Document History'' option under ''Documents Management'' tab. 
Document Number of all the Invoices/Bill of Supply/Invoice cum Bill of Supply generated will be displayed on this screen.


How to Download JioGST Bill Lite?

Bill Lite is a software product built by JioGST